Weather you choose barrels or totes is up to you and will depend on availability, budget, inclination towards plumbing, atheistic and space. For more information, check out our page on daisy chaining rain barrels.
If you choose totes, here are a few things we have learned from our experiences.
SIZE. Water totes come in two sizes. 330 gallons and 275 gallons. We have two of each. In both cases the 330 gallon totes feed into the top of the 275 gallon totes. If you are setting up your system on slope, you might be able to use all 330 gallon totes. If not, then this is an easy way to do it. More in the DAISY CHAIN section on why hard plumbing a direct connection is not a good idea.
CRATES: We have come across two different types of crates. The square tube and the wire frame. Square tube seems to be the dominant style. This is good news as we havnt had any trouble with the square tube crates. We have one that is in a wire frame and it has given us trouble. We noticed that when full, the tank "sinks" down into the wire frame causing problems with connection. We had to cut away the wire directly below the connection. When we first connected our tanks, we had a rigid ABS pipe coming out of the side of one, and feeding into the top of the next. Not only did the tank sink down putting pressure on the outlet, the sides of the tank & crate bowed outward causing the pipe to point up into the air preventing water from flowing into the next tank and the whole system backed up. Solution in the DAISY CHAIN section.
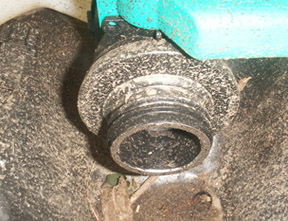 SPIGOTS: We have run into many different styles of spigots. This seems to be where the biggest difference is. I took these images over the winter. They are muddy but yours dont have to be.
- Spigot #1. This is the worst one. We failed to find anything that would match the threads and its so short, it was really hard to get something to connect and not leak. Avoid this style if you can. If you happen to have one, or get one free, we were successful cranking the hose clamp down with a socket wrench.
 Its probably tighter than advisable.
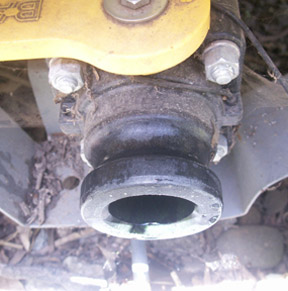
 - Spigot #2. This outlet has a large rim around the lip. We had a little difficulty getting a rubber fitting large enough to go over the large part and pressing it in enough to fit the narrow part.
- Spigot #3. This one has a small rim around a long pipe. This was the easiest to use. It quickly formed a good seal with only a little tightening.
DAISY CHAIN TOTES: Unless you are putting the totes on reinforced concrete pad, DO NOT hard pipe them together. 330 gallons of water weighs about 2500 lbs. 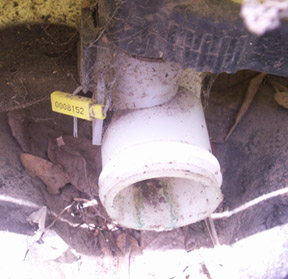 Two full totes together weight over 2.5 tons. Water is heavy. If you place them directly on the soil, they will settle & shift slightly. This will ruin your connections if there isnt some give. Our best idea thus far is to connect them with old fire hose and chrome pipe (used under bathroom sinks) which fits the best into fire hose. Fire hose is the largest diameter flexible hose we have been able to find. If you have a local marina, its a good place to look for old fire hose.
CONNECTING a garden hose:
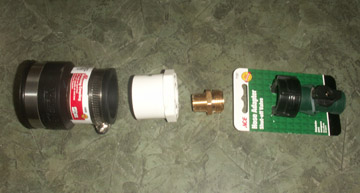
Its possible to buy parts made exactly for this purpose. This is the beta version of what we put together from our local hardware store. Left to Right.
- A rubber pipe reducer. This is for connecting a larger to smaller pipe. Buy what ever size fits your spigot. Normally 2.5" Comes with two pipe clamps.
- PVC fitting. Fits into the smaller end of the rubber reducer. Get the one that is smooth on the outside and has a 3/4" thread on the inside.
- Brass fitting. 3/4" threaded on the left side to fit into the PVC. The other is threaded for a standard hose. Put this in tightly with some putty. You dont want it to loosen when you take off the hose.
PLACEMENT: If your yard is level, pick a location central to where you do your watering. If your yard has even a minor slope, generally, you want to put your tote in the highest location you can reach from your down spout. This might mean you need to run the water this way and that a bit, but starting height is important. If you are going to put them directly on the ground, try to avoid places that have been recently disturbed and will settle. We put several large pavers under the four corners to raise the totes up a bit and spread out the weight. Ours have shifted a bit, but wont cause problems if you are thoughtful with your connections.
Use screen to keep mosquitos out and dont forget to account for overflow. We collect over 1000 gallons of water but even more goes out the over flow. Check with your local city to find out what you need to do with the extra water.
We have found a "Hose Adapter-shut off valve" to be the ultimate rain water accessory. [Pictured above on the right] For anyone new to rain water, you might be surprised to find that the water pressure varies with the amount of water in the tank and how high up the tank is. If you tank is low, or nearing empty, you will need a siphon to get the water flowing. Having a shut off valve not only allows you to stop the water when moving the hose between plants so you dont waste water, it also keeps the siphon going when you pick up and move the hose.
- Log in to post comments