Windows, even double and triple pane are still one of the weakest parts of a building envelope. A typical wall may be R13 while a good double pane window is only R-4. Adding good insulation to your windows can greatly improve your over all insulation.
These instructions are for DIY insulating roman shades.
 To begin, prep your window by removing any old hangings and hardware. Then measure your window. Add at least 4 inches to the width of the inside frame and 14 inches to the height. If your window has wide molding you might want to add more than 4" to the width. If you have a sill, plan to go around the outside of it. Now check though your personal things for the following items then head to the hardware store for the things you dont have:
- magnetic tape,
- screw eyes,
- a scrap of wood aprox. 1" x 0.5" by with width of your curtain,
- a locking pulley and or pulley and cleat
- some sturdy cord.
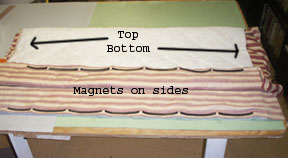
You will also need some small rings either plastic or brass and a disappearing marker is handy. I havnt found a good option for rings at the hardware store. I purchased Warm Window rings from our local JoAnns. If you want a locking pulley, you will need to purchase it from somewhere that sells drapery supplies. ****Be careful when buying your magnetic tape. Some tapes have slightly different polarity and there is nothing more frustrating than getting to the end of your project and finding that you have the wrong polarity some where and the curtain actually repels itself from the wall rather than sealing. I have generally had better results with the magnetic tape from the hardware store. Dont forget you need enough magnetic tape to go around both sides and the bottom twice. Once home, open the package and unroll it. Its a good idea to place it under your mattress to flatten it out. If you do not get the curl out of it before you begin, it will give you trouble.
 Once you have determined the finished width of your shade, cut your quilting to the finished sized. Its a good idea to add an extra inch to the width because the thickness of the material can cause some errors in measuring. Good sources for the quilted filler include old bed spreads and second hand mattress pads.
Take your quilted piece and lay it onto your lining piece. I like to use safety pins rather than straight pins since the material is thick. Cut the lining the same size as the quilting. Good sources for lining material are old drapes that have been faded but the lining is still in good condition or the remnant bin at your local fabric store.
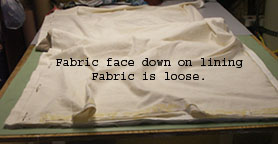
 The fourth step it to add the face fabric. I recommend using some thin material like an old sheet because thick materials will interfere with the magnets. Before you cut your face fabric, examine your material for flaws. Try to eliminate flaws or place them in a place they wont be noticed. I have made these curtains out of old curtains, shower curtains, and sheets. Cut your face fabric adding about 10" to both width and height. If you dont have quite enough its ok since you will be trimming down. Next lay the face fabric face down onto the lining matching one of the sides and leaving about 1" extra fabric at the top. The remaining 9" of length should be at the bottom. Sew a 1.25" seam.
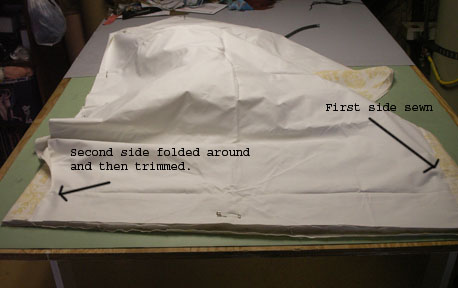 Fifth, open the seam and fold the fabric around the edge so that the face fabric is now on the outside of your curtain and the lining is on the inside with the quilting in the middle. Smooth the face fabric. Now working on the opposite edge, fold the fabric around the edge. There is no good formula for doing this since your quilted lining will take up an unpredictable amount of slack. Leave 2.75" of material on this side and cut away the extra.
 Sixth, fold the face back to its original position so that you have top down: face fabric upside down, lining right side up and quilted material on the bottom. Now sew another 1.25" seam on the other edge. You should have about 3" of slack in the face fabric.
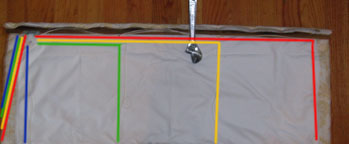
The seventh step is to determine where you quilting lines will fall. This math takes a bit of creativity. You want your quilting lines to be about 12" apart. So, take the finished length of your shade and divide by 12. 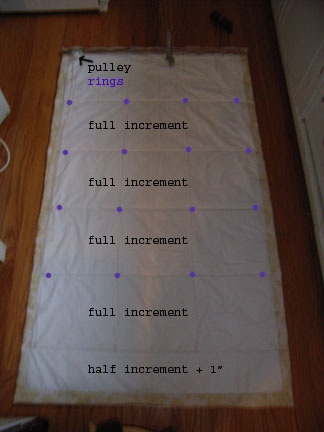 Chances are you will get a number like 4.27859. Take the length of your shade and divide by the nearest whole integer, in this case 4. That will give you the number of quilting lines. Example: Shade length 46.5" divide by 12 = 3.875. 46.5" divide by 4 (nearest whole integer) = 11.625". Rounding off to 11.5" will be fine.
Now you want to quilt the inward folds but not the outward folds so divide your interval for quilting by 2. 11.5" divide by 2 = 5.75" add 1 = 6.75". This will make the bottom section hang a bit longer. If you do not like this effect, do not add 1" just stick with your original number. Measure up the side a half increment (5.75" or 6.75") and then by full increments (11.5"). You should end up with a section at the top that is a little over a half increment.
 Now go pull that magnetic tape from under your mattress. If you purchase Warm Window magnets, they already have the polarity marked on them. If not, take all rolls purchased and scratch an arrow (this is very easy) onto the non-adhesive side every few inches. ****You will be sorry if you skip this step. Cut your magnetic tape into lengths slightly shorter than your half increment. This is so the curtain can fold up. Remove the paper backing and stick to the seam allowance making sure the polarity of all your pieces matches. Once you have done both sides, you are ready to turn the curtain by pulling it though one open end.
Its a good idea to try a test fit now. Its hard to make adjustments once the curtain is quilted. Lots and lots of safety pins will keep your fabric from slipping around on you. This is also a good time to estimate your hem. Holding the curtain 8-12" above the window (your curtain will take up this much space when folded up) make a small mark on the back of the curtain where it hits the bottom of the window. Make sure the quilting is longer than the window. A second pair of hands helps with this step. You can also do it by measuring down the wall and transferring that measurement to the curtain. If your curtain runs into the ceiling you can cut some off the top.
Smooth the face fabric. A disappearing marker really helps here. You can feel the breaks in the magnet. Using your disappearing marker and a ruler, mark from one side of the curtain to the other. From the bottom, mark the first break (inward fold) skip the second (it will be an outward fold) mark the third (2nd inward fold), etc until you get to the top. The last gap in the magnets will be an outward fold so it should be unmarked.
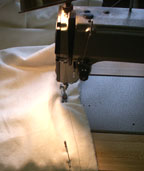
Carefully quilt across the curtain on the lines. I recommend putting the face fabric up so you can see of the material is being pulled crooked. If your sewing machine foot is sticking on the fabric, try covering the bottom of the foot with scotch tape to make it slick. Cut away the scotch tape in the middle of the foot.
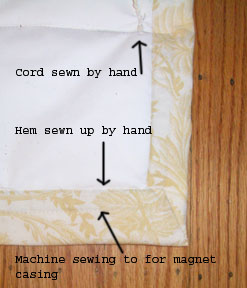 To do the hem, note your mark on the back side of the shade and decide how far below this you want to place the magnetic tape. Clearly make a second mark. This will be the height of your hem. If you have a sill, you will want to leave extra length so the curtain can wrap under the sill. Measure from the bottom of the quilting up to your second mark. Mark this length on the inside of the face fabric. This is the fold line for your hem. Add 1.25" to this number and mark again. This is your cut line (remember we had 9"). Place a row of magnetic tape along the fold line, on the other side of your 1.25" seam allowance. Fold the fabric over the magnetic and run a line of stitching to make sure it stays in place even if the adhesive lets go. Fold up and stitch in place by hand.
Almost done! Skipping the bottom quilting line, sew 1 ring near each edge and then divide the remaining space by 12. Use the same trick as above to space them evenly. Rings should be approximately 12" apart. Check to make sure your pulley can accommodate the number or cords you have set your shade up to use. The number of cords equals the number of ring columns. If your cords wont work in your pulley, either purchase a new pulley or reduce the number of cords by one. Add rings to each line of quilting above the bottom line on the inside of the curtain.
Take your scrap of wood that is approximately 0.5" x 1" and cut slightly shorter than the width of your curtain. Lay the wood flat onto the back of the curtain matching the top edge of the wood to the top of the quilting. Fold the extra fabric over the wood and staple or glue down. Your curtain is now attached to the mounting piece.
Decide on which side you want the cord. Add your pulley slightly in from the outer column of rings on the side you want the cord. Going straight up from each column of rings add a screw eye into the edge of the wood. If your screw eyes are of different sizes, use the largest eye closets nearest to the pulley as it will hold the most cords.
 The last step in making the curtain is to add the cord. If you are using a locking pulley, you might want to use an official drapery cord. If you are having trouble getting the cord though the pulley, wrap the end of the cord in a bit of scotch tape. Some pulleys are easier to thread in a particular direction. When finished your cord should be stitched to the curtain on the bottom line of quilting, pass though the column of rings then though the screw eyes, though the pulley and hang down most of the length of the drape. If you used a locking pulley, follow the directions for that pulley.
Now you are ready to mount your curtain. It helps to have extra hands here. Hold the curtain in place making sure its centered over the window. I like to use one screw in the middle of the mounting board then check that the curtain is hanging plumb before add screws to either end. Once the curtain is mounted, pull the curtain up and make sure it clears the top of the window. Adjust the placement of the curtain if needed. Next you are ready to add the magnetic tape to the window frame. ***Once again be sure to check your polarity before sticking the magnetic tape down. I find that the adhesive often disappoints me. You may need to add additional glue or thumbtacks to the end of the magnets to keep it from falling off the wall.
If you have small children or cats in the house, you may want to add a cord reel to go along with your locking pulley.
If you didnt use a locking pulley you will need to add a cleat to the side of the window. Once everything is hanging nicely, you can either braid or tie your cords together. If you have measured carefully and matched your polarities, then you should be able to give the curtain a light snap and it will stick itself to the wall forming a tight seal around the window. I know these curtains work because the air behind the curtain is typically 10 degrees or more below room temperature by morning even with double pane windows.
- Log in to post comments