Many of you are already familiar with my on going battle with Tetra Pak. Here is a new project for everyone. I thought this would be a good project because I found very little in the way of recycled pencil boxes when looking for products for the eco school supply product list. Most pencil boxes were small, kitsch and over priced.
You will need:
- 2 tetrapaks of the same size
- duck tape
- double stick tape (optional)
- 13" of magnetic tape (less is ok)
- scissors
- Sharpie or other fine tip permanent marker
- stapler
- ruler
When you empty your Tetrapak, I recommend unsticking the bottom corners so you can wash it out effectively. See illustration for step 1.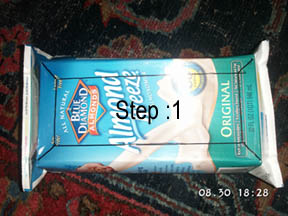
Step 1: Take the Tetrapak and mark as illustrated with a 3/4" boarder on the top. Cut out the rectangle in the center and cut to the corners.
Step 2: Double stick tape is optional, but very handy. Use the double stick tape to reassemble the corners and to stick down 3 (only 3, not 4) of the borders you have cut. Reinforce this with staples or just use staples if you dont have any double stick tape.
 Step 3: Remove the plastic spout. Cut a small scrap from the discarded center. Use this to patch the spout hole from the outside. Add 1 row of duck tape around the bottom edge.
Step 4: Taking your second Tetrapak to make the lid, use your ruler to mark 1 1/4" around the edges of the carton from the top. Cut away the back portion of the Tetrapak. Three edges will be folded in, the 4th will become part of the hinge. Cut away the corners on either end of the hinge side.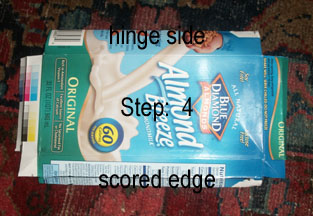
Step 5: Score around the edges of the lid about 1/2" in except the hinge side. This will be a fold line. Reassemble the two front corners and fold in where you have scored using the double stick tape to secure both the corners and the fold ins. Trim away at the front corners to make the fold ins work. Add a few staples to secure the fold ins.
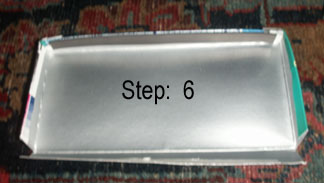 Step 6: Add half the magnetic tape to the inside of the lid and half to the outside of the box. Be sure to match the polarity of the magnets.
Step 7: Edge the lid with duck tape covering up the magnetic tape. Getting the duck tape to look nice on the corners is the hardest part so take your time. See image for step 10.
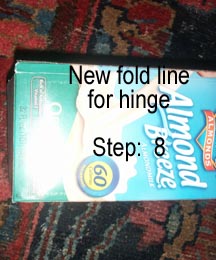 Step 8: Taking the hinge side of the lid, gently score a line about 3/16" to the outside of the original fold line. This will allow the lid to hang over the box slightly and make it easier to close. Test fit the lid on the box.
Step 9: If you are happy with the fit, use some double stick tape to add the lid to the box. Add a layer of duck tape to the inside and outside of the hinge. See image for step 10.
Step 10: Add a second row of duck tape folding over the top edge of the box covering the staples and magnetic tape. Wrapping the tape around to the back gives a nicer look. 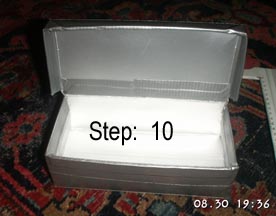 Be careful at the corners as in step 7. You will have to trim the tape at the corners of the hinge.
Now fill with pencils and erasers for school!
- Log in to post comments